Once upon a time, there was a sweater...
A jumper, more properly, since this garment lived in England, at home on a cozy little man on a cozy little show:
Sherlock.

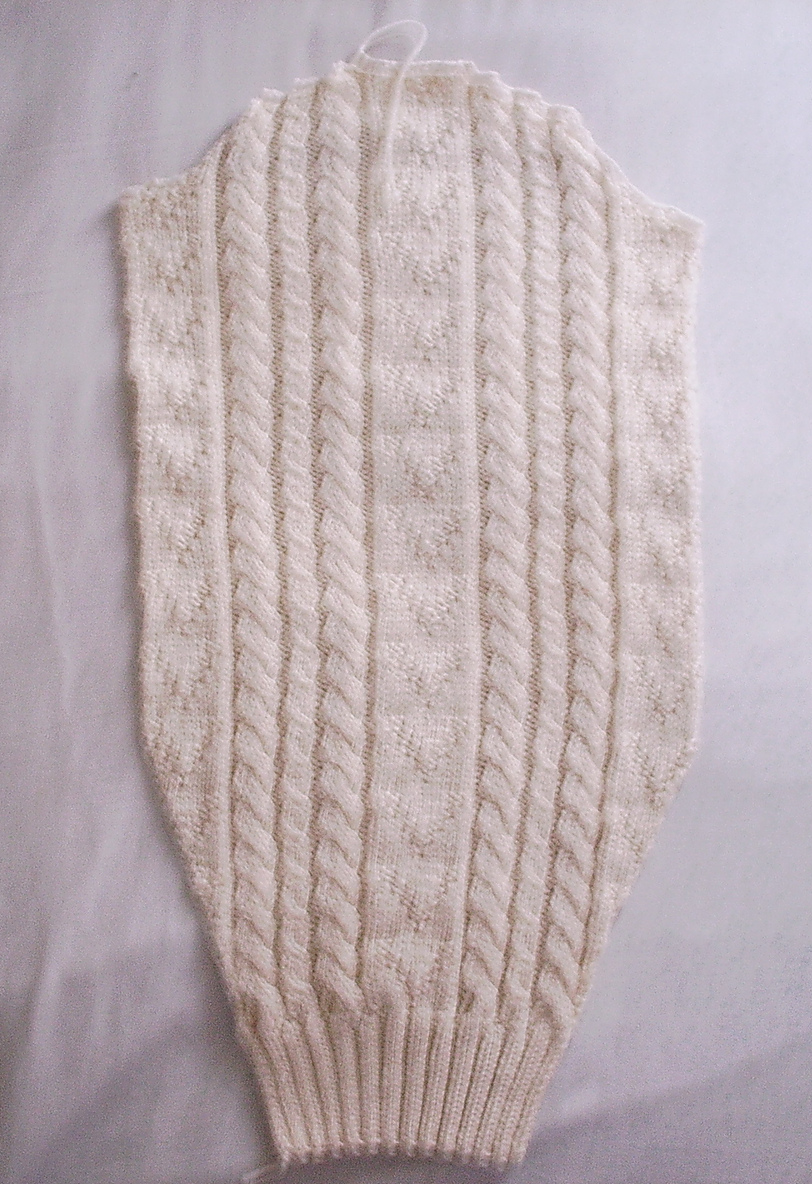
Fans of the BBC reboot of the classic detective-who-is-his-own-franchise will recognize this jumper instantly: John Watson's creamy cabled delight that had knitters all over the world scrambling to replicate it. I too had to try my hand, using
this pattern as a base-- but I discovered in my perusal of the pattern that it deviated from the screen in several ways, which was not what I wanted for this project. I wanted screen-accuracy! I wanted to replicate the sweater worn by John Watson down to the stitch count. (Well, it could perhaps be a little smaller, to fit a girl somewhat smaller than a crime-fighting army doctor.)
And thus, ladies and gentlemen, do you find here my notes, meticulously derived from HD screencaps from the show. I tried to replicate John's jumper in every way, down to the method of the arm seams and that tiny little bump made by the seam you can see on his folded-up cuff in the picture to the left.
But I digress. For my sweater, which was scaled to my 33/34" bust, I used almost six full skeins (1500 yards) of Knit Picks Bare Swish DK, which I thought matched the color of John's Jumper well enough. I assumed that the original jumper had been made of wool (because they usually are in a cold place like England, and the fabric didn't hang quite like cotton would have), so the 100% superwash merino was an added bonus. (
Side Note: this yarn is so gloriously soft, even before you do anything with it, but especially after sending it through the washer. Heaven!!!)

Gauge: One unblocked chevron pattern (11 stitches wide) equals 2 inches on size 7 needles.
BACK:
Cast on 117 sts. Work k2p1 ribbing for two inches.
Next row (WS): work set-up row for body patterning.
Chevron pattern is eleven stitches wide and twelve rows tall. Cables are cabled every six rows, on row 5 and 11 of the chevron chart.
The cable panels are each comprised of three cables: one six stitches wide, (purl 2) one three stitches wide, (purl 2) and another six stitches wide. Therefore, the body patterning looks like this:
Knit 4 (plain edging), purl 2, 3-stitch-cable, p2, 6-stitch-cable, p2, 11-stitch-chevron, p2, 6-stitch-cable, p2, 3-stitch-cable, p2, 6-stitch-cable, p2, 11-stitch-chevron, p2, 6-st-cable, p2, 3-stitch-cable, p2, 6-stitch-cable, p2, 11-stitch-chevron, p2, 6-st-cable, p2, 3-stitch-cable, p2, knit 4.
Work in pattern for nine full repeats, making the piece roughly 16 inches long.
For armhole shaping, bind off three stitches at the beginning of the next four rows (rows 1-4 of chart). Then bind off one stitch at the beginning of the next six rows. (Nine stitches bound off on either side). You should have 2 purl stitches and a 6-st-cable left at the edge of either side.
Work even for five and a half more repeats, or to nine inches of armhole.
For shoulder shaping, bind off 8 stitches at the beginning of the next four rows. Then bind off 7 stitches at the beginning of the next two rows, then bind off 6 stitches at the beginning of the next two rows. Bind off remaining stitches. :D
FRONT:
Work like back until 12 1/2 repeats long, ending with WS row 4 of chevron chart (this is the row right before the next cabling row). This is 9 repeats of body, and 3 1/2 repeats after the beginning of the armhole shaping. Now begin neck shaping.
Next row: Bind off 3 stitches at the neck edge.
Next row: Work even.
Next row: Bind off 2 stitches at the neck edge.
Next row: Work even.
Next row: Bind off 1 stitch at the neck edge 6 times in total. Work even to shoulder shaping, then do that like for the back (there will be two extra stitches left over on the last row of bind-offs, just bind those off too).
 SLEEVE:
CO 54 on small needles;
Row 1: (RS) {K2P2} rep to last two stitches, end with K2. Work for three inches. The RS will be the side where the edges are K2s.
Next row: (WS) K2, P6, K2, P3, K2, P2, Pfb, P2, K2, P11, K2, Pfb, P4, K2, P3, K2, P6, Kfb. You now have 57 stitches.
Change to larger needles and work even for the next three rows.
Next row: (WS) increase one stitch on each side of row.
Continue increasing two stitches every four rows until you have 11 Knit stitches on each side. (This may be the hardest thing I have ever had to knit, but...) work the chevron pattern as you are increasing.
You now have 57 stitches.
After increases, work until 11 1/2 repeats are complete, ending with row 4 of chart. Do sleeve cap.
Sleeve Cap:
Bind Off 3 at the beginning of the next 4 rows.
Next row, decrease once on each end of the row, maintaining pattern. Continue decreasing every RS row until the chevron band and the two purl stitches on either side have been eliminated. 53 stitches left.
(Note: The first row of this next pair is a little tricky, as you have to cable the 6-cable and then bind off the first three stitches of it, then work the rest of the row as normal. )
Next, BO 3 next two rows.
Next, Bo 5 next four rows, Bo 6 next 2 rows, Bo last 15.
(The top row that shows on John's jumper is a Row Seven of the chart.)
Row 11 of chart: Bo 3
Row 1: Bo 5
Row 3: Bo 5
Row 5: Bo 6
Row 7: Bo 15
FINISHING:
I used a mattress stitch on the side and arm seams, and a simple whipstitch to attach the shoulders and the set-in sleeves.
And There you have it! A finished product hopefully worthy of any cosplay. As always, if you have any questions about any of my projects or designs, I will be happy to answer them. Send me an email or a Ravelry message, and happy crafting!
 The idea for this shawl actually began as a scarf based on the same principle: nine distinct charts for nine unique characters. The concept stayed in design limbo for a month or so while I finished up that spring semester and some other projects (as part of Nerd Wars). I even started some swatches, trying to come up with my own lace stitches, learning the ins and outs of yarnovers and the functional differences between a K2tog and an SSK. It wasn't until finals season rolled around that I thought to try to migrate the idea to a shawl.


