Sunday, July 27, 2014

Rainbow Dash Scarf Is Up!

Well, everypony, the pattern is up: Rainbow Dash's lightning-bolt keyhole scarf! This pattern is now 100% Rainbow Dash approved and 20% cooler for it. As you can see, the Bernat Mosaic yarn made a beautiful striping effect in the finished scarf, spanning the entire spectrum of colors in one short piece. And since it only took 100 yards of worsted-weight yarn, this scarf would also make a great stashbuster. You could even use lots of solid-colored scraps to stripe your own rainbow! The garter-stitch construction would help to reconcile even the most contrasting variegateds. 

(As a side note: am I the only one who finds it hard to destash worsted-weight yarn or heavier, especially in small amounts? Seems like it's so difficult to find a fun and functional pattern for thick scraps.) 

Anyway, I hope you enjoy the pattern-- and Dash does too!

She decided to go nesting in the fallen-over trees in our
backyard for this photoshoot. We didn't argue with her.

Saturday, July 26, 2014

Coming Soon: Mewkerchief!

Another pattern almost through the works! This time it's a Pokemon-themed knit, based on the legendary Mew. 

 I have always had a great fondness for Mew, the rarest (and, in my opinion, the cutest!) of all Pokemon. As any Pokemon trainer will tell you, that cuteness belies an extremely powerful and adaptable Pokemon. Therefore, this kerchief is versatile and battle-sturdy, just the thing if you want to add a touch of warmth to an outfit, or just a bit of subtle Pokemon style. The long ties, which take their shape from Mew’s tail, mean that you can tie the kerchief securely on your head or around your neck without losing the effect of the design.

I'll update with links (and more pics!) as soon as the pattern is published.

Tuesday, July 15, 2014

Coming Soon: Rainbow Dash Lightning Scarf

I'm more than a little bit excited for this upcoming pattern-- it's another one inspired by a character from My Little Pony, this time featuring Rainbow Dash!

Dash has a really awesome color scheme-- sky blue with a fully-saturated rainbow-- so I'm glad I finally got to make a design that makes use of that, and a yarn that shows it off! (That would be Bernat Mosaic, a yarn I am now in love with for its long color stripes-- this entire scarf was made with only one colorway repeat of Psychedelic!)

This fully reversible keyhole scarf is inspired by that most adventurous (and Awesome!) mare, Rainbow Dash! The lightning bolt shape comes from her unique cutie mark, of a tri-colored bolt and white cloud. I’ve also included directions to crochet a cloud-shaped pin for embellishment. Since the scarf is knit entirely in garter stitch and each side has a keyhole, it is can be worn with either side looping through the other.

The pattern is in the testing stage now, so I'll be sure to update once the pattern is available for general consumption. :D

Monday, July 7, 2014

Multiplying Hexipuffs

Ok. I would say this is starting to get ridiculous, but I have actually seen completed hexipuff quilts on Ravelry, so I know that my collection is meager in comparison.

But seriously, I had forgotten how addicting these little puffs are to knit. I hadn't touched this project in years, but I sat down to make a new puff on a whim a couple days ago (because I had fun new sock yarn scraps, I think) and suddenly I have fifteen more.


These tiny projects-in-themselves are exactly what I have been craving to knit, apparently, because my other recent projects have all been long in the making (and especially long in the writing up-- yes, there are some new designs in the works, LotR and Pony fandoms ;) ). It was high time for some Instant Gratification. And a lot of it. 

The thing I really love about the idea for this quilt (besides the aforementioned instant-puff-gratification) is that it traces your yarn history, and fingering-weight tends to be especially significant and precious, at least in my stash. In this picture alone, you can see seventeen different yarns and colorways. I haven't linked them all on my project page because that would get messy by project's end, but I can detail some of them here. The yellow-and-blue stripey ones were from a skein dyed for me by a friend for my birthday, and the brown-and-green one in the top right and the three yellow-and-red ones were from her shop. The dark blue tonal ones are leftovers from my Sherlock Cowl, from Knit Picks. And the purple-yellow-green-blue ones are a colorway called "Shire" that was one of (if not the first) hand-dyed, fancy wool purchase I made as a new knitter. The pink-and-purple one I won in a group giveaway back during my Nerd Wars days, and the dark blue sparkly ones are leftovers from my Luna Scarf. The white-and-blue one in the middle I remember tie-dying at another friend's birthday party. (Nothing says you're a nerd for knitting like bringing yarn to a shirt-dying party. XD)

So, anyway, I'm sure there will be more of these by the end of summer. They seem to breed like tribbles, which is at once awesome and also... disconcerting. Because we all know what happened once those critters got going... (And if you've never heard of a tribble, google it and hope that your hexipuff bucket fills as quickly, but not at the expense of your pantry.)


Monday, June 30, 2014

Fellowship! The Shawl

This is one of my favorite projects I've ever made. Not only is it amazingly gratifying that the design was made up out of my own head, but the final project is something I still wear all the time: the colors go with almost everything, and the shape of the shawl makes it so easy to wear a dozen different ways (see my project page on ravelry for some of them). Even more wonderful was watching all of the other projects that have been made with this pattern-- solid, variagated, beaded, you name it! You can find the pattern available here on Ravelry, and the thread for the Knit-a-long here in the Lord of the Rings group.

The idea for this shawl actually began as a scarf based on the same principle: nine distinct charts for nine unique characters. The concept stayed in design limbo for a month or so while I finished up that spring semester and some other projects (as part of Nerd Wars). I even started some swatches, trying to come up with my own lace stitches, learning the ins and outs of yarnovers and the functional differences between a K2tog and an SSK. It wasn't until finals season rolled around that I thought to try to migrate the idea to a shawl.

I was inspired by a set of yarn skeins I had just bought from another raveler, a gradience set of Sushi Sock from Unique Sheep in the colorway Fellowship. I wanted to do something really special with it, something worthy of the yarn's natural beauty (and Lord of the Rings theming). The idea for using it to actually trace the development and journey of the nine characters it was named for wasn't far behind. (And for the curious, the exclamation point in "Fellowship!" comes from "Fellowship! the Musical", an actually really well-done affectionate parody whose soundtrack helped keep the creative juices flowing during this shawl's development process.)

And so red became the One Ring and Boromir, Legolas and Gimli; purple and blue became Aragorn and Merry and Pippin; green became Sam and Frodo. Each chart evolved naturally from the last, yet still tying directly into each respective character. 

(This was the design element that was most important to me for this shawl, because I've seen so many designs and projects that were inspired by Lord of the Rings, but don't say why. When you say your lace is elvish, it makes me curious! I want to know how it ties in!) So that is something I've tried to keep up with each of my designs-- each one comes with its own story, its own tie-in that inspired its colors, shape, stitches, and name. But it all began with this shawl.

Materials: 500 yards of fingering weight yarn. 
Needle: US size 6 circular, or sized to get the drape you want.
Gauge: My gauge was 6 stitches to the inch, but since this is not a fitted garment, gauge can vary.
Finished Measurements: 46 inches wide and 22 inches deep, blocked.


Wednesday, June 18, 2014

The Watson Sweater Saga (Free Pattern)

Once upon a time, there was a sweater...

A jumper, more properly, since this garment lived in England, at home on a cozy little man on a cozy little show: Sherlock.

Fans of the BBC reboot of the classic detective-who-is-his-own-franchise will recognize this jumper instantly: John Watson's creamy cabled delight that had knitters all over the world scrambling to replicate it. I too had to try my hand, using this pattern as a base-- but I discovered in my perusal of the pattern that it deviated from the screen in several ways, which was not what I wanted for this project. I wanted screen-accuracy! I wanted to replicate the sweater worn by John Watson down to the stitch count. (Well, it could perhaps be a little smaller, to fit a girl somewhat smaller than a crime-fighting army doctor.)

And thus, ladies and gentlemen, do you find here my notes, meticulously derived from HD screencaps from the show. I tried to replicate John's jumper in every way, down to the method of the arm seams and that tiny little bump made by the seam you can see on his folded-up cuff in the picture to the left.

But I digress. For my sweater, which was scaled to my 33/34" bust, I used almost six full skeins (1500 yards) of Knit Picks Bare Swish DK, which I thought matched the color of John's Jumper well enough. I assumed that the original jumper had been made of wool (because they usually are in a cold place like England, and the fabric didn't hang quite like cotton would have), so the 100% superwash merino was an added bonus. (Side Note: this yarn is so gloriously soft, even before you do anything with it, but especially after sending it through the washer. Heaven!!!


Gauge: One unblocked chevron pattern (11 stitches wide) equals 2 inches on size 7 needles.
BACK: 
Cast on 117 sts. Work k2p1 ribbing for two inches. 
Next row (WS): work set-up row for body patterning.
Chevron pattern is eleven stitches wide and twelve rows tall. Cables are cabled every six rows, on row 5 and 11 of the chevron chart.

The cable panels are each comprised of three cables: one six stitches wide, (purl 2) one three stitches wide, (purl 2) and another six stitches wide. Therefore, the body patterning looks like this: 
Knit 4 (plain edging), purl 2, 3-stitch-cable, p2, 6-stitch-cable, p2, 11-stitch-chevron, p2, 6-stitch-cable, p2, 3-stitch-cable, p2, 6-stitch-cable, p2, 11-stitch-chevron, p2, 6-st-cable, p2, 3-stitch-cable, p2, 6-stitch-cable, p2, 11-stitch-chevron, p2, 6-st-cable, p2, 3-stitch-cable, p2, knit 4.
Work in pattern for nine full repeats, making the piece roughly 16 inches long.
For armhole shaping, bind off three stitches at the beginning of the next four rows (rows 1-4 of chart). Then bind off one stitch at the beginning of the next six rows. (Nine stitches bound off on either side). You should have 2 purl stitches and a 6-st-cable left at the edge of either side.
Work even for five and a half more repeats, or to nine inches of armhole.
For shoulder shaping, bind off 8 stitches at the beginning of the next four rows. Then bind off 7 stitches at the beginning of the next two rows, then bind off 6 stitches at the beginning of the next two rows. Bind off remaining stitches. :D
FRONT: 
Work like back until 12 1/2 repeats long, ending with WS row 4 of chevron chart (this is the row right before the next cabling row). This is 9 repeats of body, and 3 1/2 repeats after the beginning of the armhole shaping. Now begin neck shaping.
Next row: Bind off 3 stitches at the neck edge. 
Next row: Work even. 
Next row: Bind off 2 stitches at the neck edge. 
Next row: Work even. 
Next row: Bind off 1 stitch at the neck edge 6 times in total. Work even to shoulder shaping, then do that like for the back (there will be two extra stitches left over on the last row of bind-offs, just bind those off too).
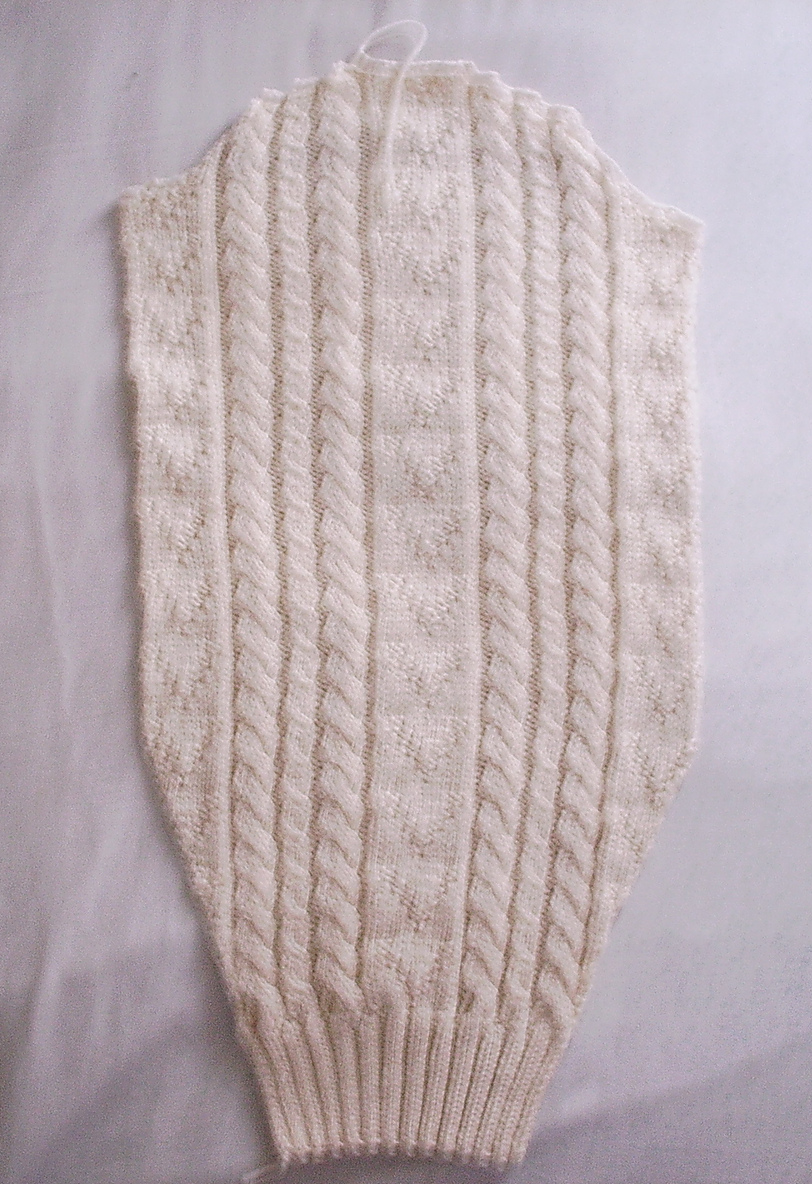
SLEEVE:
CO 54 on small needles; 
Row 1: (RS) {K2P2} rep to last two stitches, end with K2. Work for three inches. The RS will be the side where the edges are K2s. 
Next row: (WS) K2, P6, K2, P3, K2, P2, Pfb, P2, K2, P11, K2, Pfb, P4, K2, P3, K2, P6, Kfb. You now have 57 stitches.
Change to larger needles and work even for the next three rows. 
Next row: (WS) increase one stitch on each side of row. 
Continue increasing two stitches every four rows until you have 11 Knit stitches on each side. (This may be the hardest thing I have ever had to knit, but...) work the chevron pattern as you are increasing.

You now have 57 stitches.
After increases, work until 11 1/2 repeats are complete, ending with row 4 of chart. Do sleeve cap.
Sleeve Cap: 
Bind Off 3 at the beginning of the next 4 rows. 
Next row, decrease once on each end of the row, maintaining pattern. Continue decreasing every RS row until the chevron band and the two purl stitches on either side have been eliminated. 53 stitches left. 
(Note: The first row of this next pair is a little tricky, as you have to cable the 6-cable and then bind off the first three stitches of it, then work the rest of the row as normal.

Next, BO 3 next two rows. 
Next, Bo 5 next four rows, Bo 6 next 2 rows, Bo last 15. 

(The top row that shows on John's jumper is a Row Seven of the chart.) 
Row 11 of chart: Bo 3 
Row 1: Bo 5 
Row 3: Bo 5 
Row 5: Bo 6 
Row 7: Bo 15


FINISHING:
I used a mattress stitch on the side and arm seams, and a simple whipstitch to attach the shoulders and the set-in sleeves.


And There you have it! A finished product hopefully worthy of any cosplay. As always, if you have any questions about any of my projects or designs, I will be happy to answer them. Send me an email or a Ravelry message, and happy crafting!


Charity Baby Hat (Free Pattern)


I designed this hat for a service learning project I was involved in for a college course. My group and I would get together every week and teach people at a local senior center to knit and crochet. All the finished projects would be donated. We ended up making quite a few of these little baby hats, so I thought the pattern would be worth sharing. 


Size: 11 inch circumference.
Materials: About 40-50 yards of worsted weight yarn.
Hook: J (6 mm).
Gauge: 3 double crochet and 2 rows to the inch.


Hat:
Note: The chain 3 at the beginning of each round counts as 1 dc.
Round 1: Chain 3, make 11 more dc in third stitch from hook.  Join with sl st to top of first chain.
Round 2: Chain 3, dc in same stitch as last sl st.  2 dc in each dc around. (24 dc) Join.
Round 3: Chain 3, dc in each dc around. (24 dc) Join.
Round 4: Chain 3, dc in same stitch as last sl st, *dc in each of next 2 dc, 2 dc in next dc, repeat from * to last 2 stitches.  Dc in each of next 2 dc.  Join. (32 dc)
Rounds 5-11: Chain 3, dc in each dc around. (32 dc) Join. Fasten off. 

Weave in ends.

This pattern can also be found here on Ravelry.